

In this tutorial, we'll be building a real world web application to showcase how docker works with real world apps.
We’ll be covering the following topics:
- How to Dockerize a web application & create production grade
DockerFile. - Will go through a number of CLI Commands
- Will learn how to persist data from docker containers using docker volumes
- Networking multiple docker containers together
- Learn tactics to optimize docker images and cleanup disk space
- will learn how to run custom scripts after docker container starts
Creating a Simple Web Application
We’ll be creating a super simple flask application which runs a counter for us which increments upon page reload, the counter state is being saved on redis (in-memory key-value data store). We’ll be looking into the real world scenarios and examples.
Directory Structure
Here we have the following set of files:
- Dockerfile (which we’ll create in a while)
- app.py
from flask import Flask

app = Flask(__name__)


@app.route('/')
def counter():
    return '0'
- requirements.txt
FLASK==0.12- __init__.py
Dockerfile
FROM python:3.8-alpine

RUN mkdir /app
WORKDIR /app

COPY requirements.txt requirements.txt
RUN pip install -r requirements.txt

COPY . .

LABEL maintainer="Usama Munir <[email protected]>" \
	  version="1.0"

CMD flask run --host=0.0.0.0 --port=5000
Building the Docker Image
docker image build -t web1 .This will run our Dockerfile from top to bottom and builds us the docker image.
Inspect the Docker Image
docker image inspect web1This will result in a json output showcasing a lot of useful information about our image.
Rebuilding the Docker image with version
docker image build -t web1:1.0Here we’ve rebuilt the image with a specific 1.0 tag. You can see it in the json dump on inspect.
List all Docker Images
docker image lsDeleting the docker Image
docker image rm <repository>:<tag>To be more precise:
docker image rm web1:1.0Authenticate the Docker CLI
docker loginTagging Image to Docker Hub Username
docker image tag web1 usamamuneer/web1:latest Pushing Image to Docker Hub
docker image push usamamuneer/web1:latestPulling from Docker Hub
docker pull usamamuneer/web1:latestRunning Docker Containers
docker container run -it -p 5000:5000 -e FLASK_APP=app.py web1Listing Containers
docker container lsWe can also list view stopped containers likeso,
docker container ls -aRemoving the Container
docker container rm <name>Or we can also do the same in container run comamnd likeso,
docker container run -it --rm --name web1 -p 5000:5000 -e FLASK_APP=app.py web1Now if we stopped the container, it’ll automatically deletes the container for us using its name variable.
Running Container in the Background
docker container run -it --rm --name web1 -p 5000:5000 -e FLASK_APP=app.py -d web1We can simply pass a -d flag and it’ll run the container in the background while allowing us to use the same terminal window to run the other commands.
Viewing Container Logs
docker container logs web1Also, we can pass a -f flag to view logs in real time likeso,
docker container logs -f web1Viewing Docker Stats
docker container statsStopping the Containers
docker container stop <name>Restarting Containers on failure
docker container -it --name web1_2 -p 5000 -e FLASK_APP=app.py -d --restart no-failure web1 Notice that, here we’ve used the --restart flag. If somehow our docker daemon crashes out or something else happened, our docker container will be back up & running without having to manually start it over.
Code Reloading with Volumes
Now we’ll look into how to make code changes to the app and see them in the browser.
If you notice, when any changes are made in the app.py file while the container the up it won’t reflect until we stop the container and rebuild the image and re-run the container. That’s a number of commands only to reflect changes on the browser. Well docker came in for the rescue here and provides with volumes & we can simply add up the -v flag postfix the directory we want to use as a volume likeso,
docker container run -it -p 5000:5000 -e FLASK_APP=app.py -d --rm --name web1 -v $PWD:/app web1Linking Containers with Docker Networks
Now we’ll see how to link multiple containers together over a docker network.
Here we need to boot up another container, we’ll be booting up a redis container here. Let’s pull in redis first likeso;
docker pull redisAlso, let’s include redis in our app.py as well before building image.
from flask import Flask
from flask_redis import FlaskRedis

app = Flask(__name__)
app.config['REDIS_URL'] = 'redis://redis:6379/0'

redis = FlaskRedis(app)


@app.route('/')
def counter():
    return str(redis.incr('web2_counter'))
Please note that in order to connect two containers, they need to belong to the same network. It doesn’t matter if they are on virtual machines or physical hardware. If they’re not on the same network, they won’t be able to talk to each other.
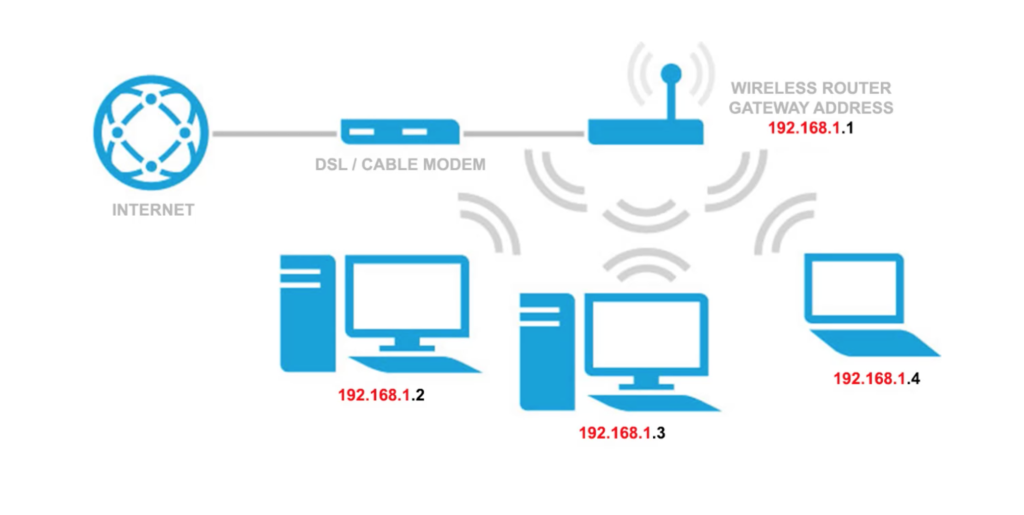
Let’s say we’ve only two types of networks: Internal(LAN) and External (WAN).
Here we’ve a number of computers connected to a router over wifi. In this example each computer will be able to talk to the others because they’re all on the same local network. Also if we run a local container running at 0.0.0.0:500 on the laptop (as shown in picture below), the other computers can access this address too.
Docker allows us to run containers on multiple networks & we can choose from Dockers’ default networks or can even use our own internal or external networks. Now let’s see how we can use networks with Dockers.
By default Docker creates some default networks for you, view it like:
docker network lsInspecting Docker Network
docker network inspect bridgeHere bridge is the name of a default docker network. It’ll output the JSON information of the network.
[
    {
        "Name": "bridge",
        "Id": "9d123c48b88ea84597632216c61168d473970f4cdd2447a13e85a568a9b0b666",
        "Created": "2020-04-13T19:28:06.563405654Z",
        "Scope": "local",
        "Driver": "bridge",
        "EnableIPv6": false,
        "IPAM": {
            "Driver": "default",
            "Options": null,
            "Config": [
                {
                    "Subnet": "172.17.0.0/16",
                    "Gateway": "172.17.0.1"
                }
            ]
        },
        "Internal": false,
        "Attachable": false,
        "Ingress": false,
        "ConfigFrom": {
            "Network": ""
        },
        "ConfigOnly": false,
        "Containers": {},
        "Options": {
            "com.docker.network.bridge.default_bridge": "true",
            "com.docker.network.bridge.enable_icc": "true",
            "com.docker.network.bridge.enable_ip_masquerade": "true",
            "com.docker.network.bridge.host_binding_ipv4": "0.0.0.0",
            "com.docker.network.bridge.name": "docker0",
            "com.docker.network.driver.mtu": "1500"
        },
        "Labels": {}
    }
]
Note that the Containers object is empty in this network, now let’s run a redis container in the background.
docker container run --rm --name redis -itd -p 6379:6379 redis:latestNow if we re run the docker container inspect bridge command again, we’ll notice the change in the Containers object.
 "Containers": {
            "cb3c953c8fa23ea696dd841c41196a1330bf20c2f48d6d1bb0b08fb32cc246d4": {
                "Name": "redis",
                "EndpointID": "98a9d18fab39f36c6ffc5956ef323bee3f5ba2f94fcc4e7a5f639009599a63b8",
                "MacAddress": "02:42:ac:11:00:02",
                "IPv4Address": "172.17.0.2/16",
                "IPv6Address": ""
            }
        },
Now we’ll run the other container
docker container run --rm -itd -p 5000:5000 -e FLASK_APP=app.py -e FLASK_DEBUG=1 --name web2 -v "$PWD:/app" web2We can check the running containers on the servers using ifconfig and ping commands, but docker recently removed ifconfig and ping from alpine images. So let’s fix that first. Add the following in your Dockerfile (under Alpine image)
RUN apt-get update && apt-get install -y net-tools iputils-pingand stop & Rebuild the container. Run the following commands in order:
docker container stop web2

docker image build -t web2 .

docker container run --rm -itd -p 5000:5000 -e FLASK_APP=app.py -e FLASK_DEBUG=1 --name web2 -v "$PWD:/app" web2
Verifying the IP Addresses of the containers over the network
docker exec redis ifconfig

docker exec web2 ifconfig
and later can ping to their respective ip addresses to verify if its working likeso:
docker exec redis ping 172.17.0.2

docker exec web3 ping 172.17.0.3
Please note that, in your case, IP address could be different.
Now let’s try to use redis with our flask app & with docker we don’t have to bind the specific IP addresses. Let’s start by binding containers to our own custom network.
Create a new Custom Bridge Network
docker network create --driver bridge mynetworkNow stop & restart our containers & bind to our newly created custom docker network
docker container stop redis

docker container stop web2

docker container run --rm -itd -p 6379:6379 --name redis --net mynetwork redis

docker container run --rm -itd -e FLASK_APP=app.py -e FLASK_DEBUG=1 -p 5000:5000 --name web2 --net mynetwork web2
Here we’ve used a --net flag to assign our custom docker network. Now let’s inspect our custom network likeso;
docker network inspect mynetworkNow let’s ping redis from our flask app.
docker exec web2 ping redisDebug Redis from Redis-CLI
We can also debug inside of our redis container if we ran into a problem like:
docker exec -it redis redis-cliPersisting Data using Named Volumes
We’ll use named volumes to persist data in our redis.
Creating Named Volumes
docker volume create web2_redisNow stop & re-run our redis container with the volume.
docker container run --rm -itd -p 6379:6379 --name redis --net mynetwork -v web2_redis:/data redisNow head over to the browser and reload the page a couple of times to increment the counter. Now stop and re-run the redis container and try this step again, you’ll see the state is being maintained now in your browser and the counter starts from where you’ve left it.
Sharing Data between Containers
Sometimes we’ve scenarios where we need to need files between containers name it as our static js files or our css files or fonts, could be anything.
Modify Dockerfile to add Volume
Let’s say we have a public folder containing folders of js and css alongwith some files.
Firstly, open up Dockerfile and add the following line init.
VOLUME ["/app/public"]
Now re-build the image and re-run the containers.
docker container run --rm -itd -e FLASK_APP=app.py -e FLASK_DEBUG=1 -p 5000:5000 --name web2 --net mynetwork web2

docker container run --rm -itd -p 6379:6379 --name redis --net mynetwork --volumes-from web2 redis
Now let’s check on the redis container if this works
docker container exec -it redis shWe can now simply cd into /app/public directory and we shall see the folders and files.
Real-Time File Manipulation
What if we want to keep track of our files in real-time as we’re making changes on these. Well we can do this using volumes again.
Let’s stop both containers and re-run. This time we’ll be assigning an additional explicit volume flag to the flask container to persist realtime changes on the shared volume directory.
docker container run --rm -itd -e FLASK_APP=app.py -e FLASK_DEBUG=1 -p 5000:5000 --name web2 --net mynetwork -v "$PWD:/app" -v "/app/public"  web2

docker container run --rm -itd -p 6379:6379 --name redis --net mynetwork -v web2_redis:/data --volumes-from web2  redis
Now if we bash again in our redis container, we shall see the real-time changes we make on the public folder.


